
There are a few tips that we can do to maximize the capacity of RAM on the Operating System. Here is one of the steps:
Switch mode 'PAE', in Windows XP:
1. Right-click on the 'My Computer' and select "Properties".
2. Go to the Advanced tab and under the tab Startup and Recovery, Settings and click on "Edit".
3. This will open a notepad containing the boot.ini file. Any posts under the "[operating systems]" is written line: multi (0) disk (0) rdisk (0) partition (2) WINDOWS = "Microsoft Windows XP" / noexecute = OptIn / fastdetect try to change to: multi (0) disk ( 0) rdisk (0) partition (1) WINDOWS = "Microsoft Windows XP" / noexecute = OptIn / PAE4.
Save the file and exit earlier.
Activate PAE mode, in Windows Vista:
1. Press the Windows key + R, type cmd and then press and hold enter.
2. Press Ctrl + Shift + Enter to execute the prompt as administrator.
3. Enter command Bcdedit / Set and press forceenable SAP enter.A
Nice work.
MS outlook is a software you used to set the messages you enter through email via POP3 and SMTP protocols. Therefore, before you make configuration in MS outlook, you had to first-setting your email account. Enable POP forwarding in the settings menu do you have email, and save the settings.
The next step you setting new MS outlook on a computer. following steps settings:
1. Run the application MS outlook. ago Click tools - options.
2. In the dialog box email accounts, click add a new email account, click next.
3. Select the type of server is the POP3, and click next.
4. Fill in your name field with your name, email address with your email address, incoming mail server (POP3) and outgoing mail server filled with
=> email for my indonesian filled mail.yahoo.co.id
=> yahoo email for international filled: mail.yahoo.com
=> for gmail filled: gmail.com ago for a username and password fill in your username and password you normally use for you to login to your account.
5. Make sure the settings for you if you do right or not, please click the test account settings. if successful, Click next.
6. Email setting process is complete, click finish.
7. You can send or receive email via MS outlook on the computer.
Be safe working..
Did you know that Windows is using our 20% Bandwidth?
Yes indeed correct, windows that actually steal 20 percent of our internet access, why?
Because the windows OS that is always wanted, such as Up To Date Service Pack SP3 and, in consequence of that he deliberately automatic update in the background tasking us, so to take back our bandwidth and faster connection to do the following:
1. Click start, run trus type "gpedit.msc" (Do not use quotes).
2. In the computer configuration - administrative templates - click Network.
3. Click Qos packet scheduler - Double Click on Limit Reservable Bandwidth.
4. Click Enabled reservable bandwidth and change the setting to 0 (zero)% out that Click Apply and click OK.
Restart your Computer. But all of that also depends on the speed of your connection. Tips can speed connection if you use the OS Windows XP and Vista.
Have tried Windows 7? Kuasai steps pro-fast computer with Windows 7, so that the performance of the operating system that is still testing it can be more steady.
1. MP3 song in order to remain intact, Windows 7 has a weakness in Windows Player 12 because it has a bad bug. This bug will automatically add the missing metadata, including album art. The problem this can cause the file is not intact anymore. To fix, install updatenya from the Microsoft site.
2. Right click the The Sakti, Right-click on the blank to set the desktop resolution screen, so no need to display the settings first. Right-click on the Explorer icon in the taskbar, to access the public folder system that is used as Documents, Pictures, and other more quickly. If do not want to use Internet Explorer and want to move from taksbar, just right-click on the IE icon, select "Unpin this program from the taskbar", then install another browser.
3. The keyboard shortcut Alt + P: To show or hide the display window Explorer.
Windows Logo + G: Showing the gadget in front of other windows-windows.
Windows Logo + + (plus key): Zoom in.
Windows Logo + - (minus key): Zoom out.
Windows Logo + Up: increase the size of window.
Windows Logo + Down: the window size.
Windows Logo + Left: Moving toward the left side of the screen.
Windows Logo + Right: Moving towards the right side of the screen.
Windows Logo + Home: Meminimize / restore window but that is being displayed.
4. Set the UAC (User Account Control) irritated with the number of 'warning' (alert) as in Windows Vista? Arrange the following steps: Start -> Control Panel -> Change User Account Control Settings.
5. Writing Cakram Digital Windows 7, finally provides a service for 'burning' ISO file directly to CD or DVD form. For the sake of convenience, live double click on the file, select the drive with a blank disc and click Burn.
6. More quickly access the video, right click on the Start menu, then go to Properties -> Start Menu -> Customize, and set the video options on the "Display as a link." Can now access the folder with the short video.
7. An account for Flickr in Flickr? To accelerate the opening, visit the site I Started Something, Connector and download it, and select Open. With this, "Flickr Search 'will be added in the Searches folder, can also find photos on the desktop. Easy huh?
Sumber : detikinet
=> turn off the "autoplay", to actively prevent autorun.inf.
=> I Install antivirus on your computer to check, for example, Kaspersky, and update you as often as possible.
=> Use Deepfreezer, to protect the Directory "C:". so that each installation will not be mean, because when the computer restart, configuration Deepfreezer will restore the "C" to the original, so that every installation you do need a permit password Deepfreezer.
=> When you first use a computer or light Flashdisk, to open / execute the folder / file do not double-clicking (click 2x), but right click and select "open". because the virus often change this option, a "Test" command or the other, sometimes I make a folder open in a new window and flooded the window when you click on many folders.
This one sign of the virus and the file autorun.inf.
@abrar2009
You are bored waiting for the process of booting? When you first install it already feels old. Moreover, if a lot of software already installed. There are ways to speed up booting Windows XP, including: Double-click Secondary IDE Chanel to open Properties. Perform the same steps as before. Hopefully useful.
Open notepad and type "del c: windowsprefetchntosboot-*.* / q" and save the name ntosboot.bat.
Press winkey + R, then type gpedit.msc. and Open Computer Configuration> Windows Settings> Scripts.
Then, double-click Shutdown. In the Shutdown Properties window, click Add> Browse, then enter the file "ntosboot.bat" and click Open. Click OK.
Press and winkey + R, then type devmgmt.msc.Klik two IDE ATA / atapi controllers.
Klik dua kali Primary IDE Chanel untuk membuka Properties. Click the Advanced Settings tab. On the device 0 or device 1, a change Device Type None. Click OK.
The ONWJ concession stretches from Cirebon in the east to the Seribu Islands in the west. The ONWJ facilities include 670 production wells, 170 platforms, over 40 processing and service facilities, along with approximately 1,600 km of sub-sea pipelines.According to data from Ministry of Energy and Mineral Resources, the block produced 270MMCFD of gas in 2008 and more than 20,000 BOPD of oil.
I folowed and used DD-WRT Firmware ver. 23 sp1 development since 2007 till right know has published the latest firmware version 24 sp1, I used it for my Access Point Linksys type WRT54GL as supplying internet benwitdh gateway to our user around my home. But so I has been using this unit WRT54GL just for Access point only, the routing of data to used The Board of Linux Mikrotik.
So anyway I just want to say this DD-WRT Firmware is realy easy to used and sure also open source development. Thanks for all of spesialist of DDWRT people to given contribution to developing this open source firmware.
At this time I shared to you all how to optimizing the latest firmware ver 24 sp2 for your Linksys WRT54GL, and expected can give to add known how to used it like tutorial below :
1. The Open Source WRT54G Story
2. DD-WRT Tutorial 1: Static DHCP
3. DD-WRT Tutorial 2: Extend Range with WDS
4. DD-WRT Tutorial 3: Building a Wireless Bridge
5. DD-WRT Tutorial 4: Defining Priorities with QoS
6. DD-WRT Tutorial 5: Wireless Repeater
Tips prior reading:
be prepare to make up coffee cup and take cigarate prior reading. Thanks @abrar2009
As most router firmware is proprietary code, vendors have no such obligation. It remains unclear whether Linksys was aware of the WRT54G’s Linux lineage, and its associated source requirements, at the time they released the router. But ultimately, under outside pressure to deliver on their legal obligation under the GPL, Linksys open sourced the WRT54G firmware in July 2003. With the code in hand, developers learned exactly how to talk to the hardware inside and how to code any features the hardware could support. It has spawning a handful of open source firmware projects for the WRT54G that extend its capabilities, and reliability, far beyond what is expected from a cheap consumer-grade router. Feature-Packed FirmwaresSo the Linksys WRT54G can be loaded with replacement firmware with exciting new features. Which raises the question – like what?Of course, you can expect most replacement firmware to support the same basic functions Linksys provides out of the box for this wireless router. Often these features will be more stable, in cases where Linksys’ bugs have been fixed by other developers. But that’s not what makes open source firmware so exciting.
DD-WRT, a free, open-source firmware coded and distributed by “BrainSlayer,” has emerged as one of the leading, most powerful and also user-friendly firmware replacements for the WRT54G series. DD-WRT is available for an increasingly wide range of routers besides the WRT54G, including models by Asus, Belkin, Buffalo Devices, Motorola and Siemens.
There are caveats to upgrading your router, and the process is not without risk, so beware. We'll assume you've got DD-WRT successfully installed, and forge ahead...
In this first detailed look at new features you can get from open source router firmware, prepare to be dazzled by the capabilities of... the Dynamic Host Configuration Protocol (DHCP) (define).
Static DHCP
Out of the box, most routers and PCs are designed to manage their IP addresses automatically. The PC, whether wired or wireless, requests an IP address and related network parameters from the router using the DHCP protocol. The router plucks an unused address from its pool of available addresses, hands it to the client, and everyone is smiling.
This process results in what is called a “dynamic IP address” – every time the PC connects to the router (on boot-up, for example, or wireless association), it is assigned a new IP address. The router may assign the same address it assigned in the previous session. Or it may not. You don’t know and, usually, you don’t care.
There are cases, though, when you want your client to receive a predictable, consistent IP address. The most common scenario is when you run a server on your client PC. Suppose you run a Web site on a PC at home, and you need access to this server from elsewhere – work, school, your laptop in the park. Your router “hides” your server from the outside world, which is normally a good thing for security. This is why a higher power invented Port Forwarding (define).
Your router will allow you to forward traffic destined for a specified port to a specific machine. In its simplest form, you can configure your router to forward incoming traffic destined for port 80 – the default port number for Web traffic – to the IP address of the PC running your Web server.
What is your Web server PC’s IP address? If it receives its address automatically from the router – you don’t know for sure. It could change, and your port forwarding would become unreliable.
One solution is to manually assign your Web server its IP address and network parameters, rather than use DHCP. However, this may limit your ability to easily connect that machine to other networks — a more likely problem for laptops. If your ISP changes name servers on occasion, this could also break your manual network configuration.
Ideally, if you continue using DHCP on your client yet can rely on always receiving the same IP address, you’re having your cake and eating it, too. Which begs the question – why would you have a cake if you weren’t going to eat it? Isn’t that the purpose of cake?
Step-By-Step
Fortunately, DD-WRT makes it easy to create static DHCP addresses for your network. Combining the best of both worlds, a static DHCP address allows your clients to continue receiving their network parameters automatically, yet you know exactly which IP address will be assigned.
 =>Open a browser and connect to your router’s administration page. The default address for DD-WRT is http://192.168.1.1, but may vary if you’ve reconfigured it.
=>Go to the Setup/Basic Settings menu. The router may first ask you to log in with your administrator password. (The default is root/admin). Scroll down the page to “Network Address Server Settings (DHCP).”
 =>Make a note of the pool of addresses the router uses when assigning dynamic IPs. Here, we see a pool of 100 addresses, beginning at 192.168.0.100 and ending at 192.168.0.200. It will be important later that your static DHCP address assignments fall outside this pool. (If you make any changes here, be sure to save your settings.)
=>Go to the page Administration/Services. Here’s where the action is. Below the “Static Leases” heading, click the “Add” button to create a new DHCP entry field.
=>Enter three values: the MAC address (define)of your client machine’s network adapter, a host name for the machine, and the IP address you want it to be assigned. Choose any host name you like, such as “webserver” or “gameserver”. Choose an IP address which follows the same pattern as those in your DHCP address pool (in our example, 192.168.0.x). Choose a number for x which is outside the address pool seen in step 3 (in our example, 201).
 Windows XP
 Mac OS X
=>If you like, add a port forwarding entry for your new static DHCP address. In our example, we set up a Web server on our client PC. Our Web server listens for traffic on the default port 80. But our ISP blocks incoming traffic to port 80, because they don’t want us running Web servers (ours is for private personal use, we totally swear).
 Click Add to create a new forwarding entry. We enter an identifier into the “Application” field, in this case, “webserver”. The router will listen for traffic on port 8088, so that we can connect from outside without being blocked by the ISP. Our destination IP address is the static DHCP entry created in step 5, and our destination port is where our Web server is actually listening, port 80. Be sure to check Enable for this definition to take effect. And, of course, Save Settings.
 A Wireless Distribution System, or WDS, is a cheap and easy way to extend your wireless network coverage. It's cheap, because you can set up a couple of sub-$60 routers with the open-source firmware DD-WRT, including the Linux-powered Linksys WRT54GL (only $56 these days on Amazon.com) and other compatible routers. It's easy, because you need only apply a few configuration settings to your routers, creating a repeater bridge to extend your wireless network.
On the second floor, "router 2" acts as both a wireless client and an access point to receive and re-transmit the signal from router 1, the key word being re-transmit. There is a cost to WDS -- clients associated with router 2 will see only half the bandwidth as those associated with router 1. For a wireless G network where the primary usage is external broadband, this presents little sacrifice, since the typical U.S. broadband connection is much slower than the wireless LAN, even at half-speed.
There are a few rules to implementing a functional WDS network. For optimal compatibility, you should use the same routers throughout -- or, in this case, the same firmware, running DD-WRT v23 on both routers.
Both routers must communicate on the same wireless channel. Both routers must be configured to the same kind of 802.11 network, whether B, mixed B/G, or G. An exclusive G network must use channel 1, 6, or 11.
If you use WPA security, you must set up both routers as exclusive G networks. DD-WRT does not support WPA2 in WDS. WEP security can be used in a network with B support.
WPA security also requires identical SSID assignments for both routers. If using WEP or no security, you can opt to assign different SSIDs to each router. You may have more control over which AP your clients connect to if each has a different SSID -- some client managers, including Windows XP's Wireless Zero Configuration, don't disambiguate APs which share the same SSID and may not always roam with the strongest signal.
Before diving in and changing your routers' firmware settings, you need some information that will come in handy later. First, log into the DD-WRT administration interface on router 1, which is connected to the broadband service.
 DNS address(es): Click on the Status/Router menu and scroll to the bottom, Internet. There you will see DNS 1, 2, and 3 as provided by your ISP. Note any addresses that appear here.
LAN IP for your Internet-connected router: click on Status/LAN and note the IP Address listed under Local Network.
The wireless MAC ID for each router: click on Status/Wireless and note the MAC address at the top of the page. This unique address identifies this router. Note this address for each router in your WDS.
 Before messing with the settings on your Internet-connected router, let's back up the current settings -- which presumably work properly, or you wouldn't be reading this article online. Should your new configuration go awry, you can restore your saved settings and get back on the Web to research the problem or e-mail us an angry rant (better yet, share it in the forums).
 The easiest way to follow along with this tutorial is to configure both routers at the same time. Ideally, connect a portable or other secondary computer to the second router's administration interface while accessing your primary router from a LAN computer.
Ideally, you should reset both routers to a clean slate -- just in case a setting somewhere might interfere with WDS. You can restore your routers to factory defaults by clicking Administration/Factory Defaults and then clicking Save Settings.
 Step 1: Set the LAN IP address for each router. Click Setup/Basic Setup and scroll to the Network Setup section. The default Local IP Address for your router, after resetting factory defaults, will be 192.168.1.1, which is usually fine. (The examples here use 192.168.0.1, but it doesn't make any difference: the first three octets of the IP address have to match for the nodes to communicate on the network.) Assign a new Local IP Address to your second router. The logical choice would be 192.168.1.2, or, as pictured below, 192.168.0.2.
Set the Gateway address for router 2 to the Local IP Address for router 1. Here, that's 192.168.0.1
 Step 2: On the same configuration page, scroll down to Network Address Server Settings (DHCP). I enabled the DHCP server on both routers, but set them to assign addresses in different ranges. Router 1 will assign addresses starting at 192.168.0.100 with a pool size of 25 users. Router 2 starts assignments at 192.168.0.200 with another 25-user pool.
You can set these parameters however you like, so long as your address pools don't overlap. With this setup, you can quickly tell from any client PC which access point is associated, based on the current IP address. That's sometimes helpful for troubleshooting.
Router 2 needs the DNS entries assigned by your ISP. You saved these earlier when reading the "You Need to Know" section above.

Step 5: Set the wireless network mode, SSID and channel for both routers. Click Wireless/Basic Settings. Set your Wireless Mode to "AP" for both routers.
Choose a "G-only" network mode only if you do not need to support any B mode clients. Remember that if you choose a mixed or B-only network, you cannot use WPA security with WDS, and therefore must use either WEP security or none at all.
 Set the SSID for each router. Remember that if you choose a G-only network and use WPA security, the SSID must be identical for both routers. Otherwise, opt for different SSIDs, as shown here. This ensures I can specify exactly which AP -- upstairs or downstairs -- to connect to.
Set the same wireless channel for both routers -- do not select "Auto." If you choose a G-only network, you must use the non-overlapping channels: 1, 6 or 11 only. If any unrelated wireless networks are nearby, you should choose a channel which doesn't conflict with it.
 Step 6: Disable wireless security, even if just temporarily. Best to get your WDS up and running without security first -- fewer factors to troubleshoot. Click Wireless/Wireless Security and choose Security Mode "Disable."
 both routers. Click Wireless/WDS. This page shows a series of blank entries for WDS relationships.
On router 1, define the relationship with router 2. Select "LAN" from the drop-down menu. Enter the wireless MAC address for router 2, which you saved previously in the "You Need to Know" section. Optionally, enter a label for this WDS association.
On router 2, repeat the same procedure, entering the MAC address for router 1, and a label that is appropriate (or inappropriate -- hey, it's your router).
Be sure to click "Save Settings" at the very bottom of the page.
Your WDS should be ready to go. As a first test, position both routers near one another so you are certain the signal strength is good. Using a client PC or portable computer, you should be able to associate with either router and access the Internet.
 Next, position the second router toward the outer edge of the first router's range. It may take several experiments, moving incrementally farther, to find the best location for the second router. Ideally, it should be close enough to the first router that it receives a strong signal, yet far enough that it extends your wireless coverage appreciably -- which is, after all, the whole point of this WDS network.
When you confirm that your WDS is working, you can revisit enabling wireless security. Be sure to choose the exact same security protocol parameters for both routers. Remember that WDS on the DD-WRT firmware does not currently support WPA2, and only supports WPA in a G-only network.
Some users report problems with port forwarding from their primary router to wireless clients associated with their second router. If you use port forwarding and experience this, try adding your second router to your primary router's DMZ (define). Click Applications & Gaming/DMZ and enter the IP address of your second router, click Enable and "Save Settings."
We’re inching our way there. Networking abilities are appearing in more non-traditional electronic devices, including some digital audio players, some digital cameras, printers, and specialized devices like the Xbox gaming consoles. But even as networking expands its reach, wireless networking in non-PC electronics is further behind still.
But wait! You actually can connect a gadget with only an Ethernet port to a wireless network. What you need is a wireless bridge. And that bridge can be a sub-$60 router with the open-source firmware DD-WRT, like the Linksys WRT54G and similar compatible routers. Using the latest v23 firmware for DD-WRT, setting up a wireless bridge is a walk in the park. (Note: DD-WRT does not include park.)
Bridge For Sale
Some products, like the Xbox, support specialized wireless bridges specifically made for this purpose. You can buy one of these and be done with it. That’s an option, but it won’t earn you any digital cred at LAN parties.
Using the versatile Linksys WRT54G (or compati
 ble) router with DD-WRT V23 or newer, let’s set up a wireless bridge that you can easily plug-and-play among any machines that need to hop online wirelessly – even a laptop without a wireless adapter of its own.
Technically, the DD-WRT supports two methods of connecting a wired device (or devices) to a wireless network: wireless client mode and wireless bridge mode.
In either mode, you have a primary router and a secondary router. In wireless client mode, devices connected to the secondary router are contained within their own subnet, separate from the subnet for devices connected to the primary router. You don’t want this.
In wireless bridge mode, all devices connected to either router are contained within one happy unified subnet – as if they were all connected to a single router. This is good.
Your primary router can be any brand of router – whatever you already have, for example. The DD-WRT firmware with wireless bridge mode need only be installed on the secondary router you're turning into a client adapter (we'll call it the "client router").
This tutorial assumes that your primary router is, like most routers, assigning IP addresses by DHCP. Without DHCP enabled, your bridged peripherals may not be able to get onto the network.
Take note of any wireless security currently enabled on your primary router. If you are using WEP, note your passphrase and key length (64-bit, 128-bit, etc.). If using WPA or WPA2, note your passphrase. Later, you’ll need to input these on the secondary router.
You will need to access the administration interface of the secondary router, your DD-WRT router. Obviously, you can’t launch a web browser from your printer. For temporary setup purposes, you need to connect a wired PC to the secondary router. The easiest way is to grab a laptop computer, temporarily disable any wireless network it has, and connect it via Ethernet cable to one of the LAN ports on the secondary router. Do not connect it to the WAN, sometimes labeled “Internet” port, which can remain empty.
Assuming your DD-WRT is set to factory defaults, its IP address is 192.168.1.1. We are going to disable its DHCP server, so you should manually configure an IP address for your temporary PC. A good choice would be 192.168.1.2.
 Connections/Local Area Connection/Properties. Scroll down to Internet Protocol (TCP/IP) and click Properties. Now click Use the Following IP Address and enter 192.168.1.2 as the IP, 255.255.255.0 as the Subnet Mask, and 192.168.1.1 as the Default Gateway.
As for Windows, enter the IP address 192.168.1.1, Subnet Mask 255.255.255.0, and Router 192.168.1.1. Click “Apply Now” to save the changes.


 Step 6. Click Status/Wireless. Scroll down to the bottom of the page, and you’ll see a button labeled “Site Survey.” You now need to associate this router to your primary router to create the bridge.
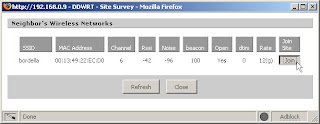 In our setup, one wireless network with SSID bordella is available. That is our primary router. Click the Join button to create the association.
DD-WRT will let you know that you’ve successfully joined the network.
To test it, you need to receive an IP address from your primary router. Revisit Step 1 and set your IP address back to automatic assignment. Unplug the network cable from your temporary PC, whistle a few times, and reconnect.
Your temporary PC should receive an IP address assigned by your primary router. You can test this by opening a browser and connecting to an Internet web site.
Hopefully, your temporary PC has connected to the Internet. Your bridge is working! You can now disconnect the temporary PC and connect the DD-WRT router to your intended peripheral(s), such as your printer or Xbox.
If your temporary PC is not receiving an IP address from your primary router and can’t connect to the Internet, the bridge is not working.
Is wireless security enabled on your primary router? If so, try to disable it, even if temporarily. Revisit the configuration of the secondary router and disable wireless security there, too. Be sure to repeat Step 6 after making any changes to your secondary router.
If the bridge works without security, double-check your settings, particularly your passphrase. If you use WPA2 security on your primary router, try WPA instead. WPA2 may not work over the wireless bridge.
Also check whether your primary router is configured to use MAC address filtering as a secondary form of security. Sometimes people forget they’ve set this. You may need to disable MAC filtering to complete your wireless bridge.
That's it. Enjoy your new wireless. @abrar209
Today’s broadband pipes are more crowded than ever. Stuffed full with file downloads, VoIP traffic, fast-twitch games, and IM sessions, there’s a lot of data squeezing its way through your Internetting. Quality of Service, or QoS, generally refers to strategies for creating priority queues, so that some data is given preference over other data.
The obvious and most common use for QoS is to give high priority to real-time traffic, like VoIP services such as Skype, and games which require the lowest latency so you have a chance to return fire. Less time-sensitive traffic, like large downloads and P2P transfers, can afford to slow down when urgent data is coming through.
You can setup relatively sophisticated, or very simple, QoS rules on a sub-$60 router like the Linksys WRT54G and similar compatible routers using the open-source firmware DD-WRT. Using the latest V23 firmware for DD-WRT, establishing QoS priorities is relatively straightforward, albeit with some quirks.
QoS Classifications
As we’ll soon see, DD-WRT lets you define QoS priorities for up to four general sources of traffic:
=>Network services. This is the most common category for defining QoS rules. Priorities defined here apply to traffic originating from specific network applications, like Skype and Bittorrent.
=>Netmask/IP address. In this category, you can promote or demote traffic originating from a particular machine or networked block of machines, regardless of which network application is creating the traffic.
=>MAC address. Similar to Netmask/IP, except that you assign priority based on a machine’s unique MAC address rather than its IP address. This lets you target specific physical machines even if they receive dynamic IP addresses.
=>Ethernet port. This special category lets you prioritize traffic originating from a particular switched router port. The “special” caveat is that Ethernet port priority only works on DD-WRT compatible routers using the ADM6996L chipset – this includes the Linksys WRT54G versions 1.0, 1.1, 2.0, and WRT54GS version 1.0.
Within any category, DD-WRT offers five priority classifications:
=>Exempt. QoS rules do not apply to this classification.
=>Premium. The elite class. Only traffic that requires the utmost priority should receive this classification, like VoIP traffic – ideally, only if the next lowest class proves insufficient.
=>Express. Like business-class in air travel, express priority is a cut above the cattle class, but not quite the comfy seats with leg room to spare. Services which benefit from real-time activity should first try express classification before being bumped to premium.
=>Standard. The default – any service without a QoS rule is assigned to standard class. Traffic in this class is treated normally except where traffic in higher classes requires bandwidth.
=>Bulk. Low priority traffic, like P2P, can be classified as bulk. Only receives bandwidth when other classifications are idle.
Before getting our hands dirty, you should be prepared with information about your broadband bandwidth. DD-WRT QoS requires that you set global values for your maximum upload and download speeds. It is strongly recommended that you set these values at between 85-90% of your “true” speeds, which leaves room for network overhead and minimizes your network latency by not saturating your connection.
Most broadband services are rated in Megabits per second (Mbps). You can multiply this value by 1024 to convert to Kilobits per second (Kbps). Suppose your cable modem service is rated at 3Mbps download/768Kbps upload:
Example download speed:3Mbps * 1024 = 3072Kbps * 0.85 = 2611Kbps
Example upload speed:768Kbps * 0.85 = 653Kbps
Setting up QoS
Step 1. Open a browser on your PC and connect to the DD-WRT router – its default address is http://192.168.1.1 unless you’ve set it otherwise. The default login is root and password is admin. Of course, you should change these. If you don’t, you’ll have terrible dreams at night.
Step 2. Click to the Applications & Gaming/QoS menu. On this page you set most of the QoS settings. To start the QoS engine, check Enable beside “Start QoS”.
Assuming you want the QoS settings to apply to your Internet usage (you do), select WAN for “Port.”
The “Packet Scheduler” item is the source of some confusion among the DD-WRT community. Short answer: stick with HTB. The alternative, HFSC, is alleged to not yet work reliably. Both describe algorithms for implementing QoS, but word on the street is that more people have more success with HTB – so, like every good parent says, do it “because we said so.”
For the “Uplink” speed, enter the number you calculated earlier. Remember to enter the value in Kbps (not Mbps), and be sure to enter your upload speed here – not your download speed. Otherwise you’ll see some slow results indeed.
Of course, enter your calculated “Downlink” speed in the next box.
The “Optimize for Gaming” checkbox is basically a pre-configured setting only for use with a predefined set of games. You can find the reported list of games on the Internet, but really, you’re better off configuring QoS settings explicitly rather than rely on a checkbox that may or may not include the particular version of a particular game. In other words, we’re leaving this unchecked.

Setting up QoS, continued:
Step 3. To add a network application to the QoS rules, first click on the drop down list beside the “Add” button. Scroll through to see if your application is already listed. DD-WRT includes so-called L7 filters for a long list of applications. An L7 filter is used to determine what application is sending traffic, not by static means like port usage, but by analyzing the packets and matching a known fingerprint. L7 filters are the most reliable way to assign QoS, because they can identify a data stream more accurately than port usage.
For each relevant network application you find in the menu, click the Add button and let the page refresh. In this example we first added bittorrent from the list followed by skypetoskype.
 For each network application you can assign a priority class. Select the priority you want for each service and then be sure to click the Save Settings button at the bottom of the page.
In the example above, we’ve assign P2P Bittorrent traffic to the lowest priority, “bulk,” and real-time VoIP Skype traffic to the highest priority, “premium.”
Step 4. Suppose you want to assign QoS for an application that isn’t listed – click the Add/Edit Service button to launch a pop-up window where you can define custom services.

We want to add a new definition for Radmin, a remote desktop application. Due to a bizarre quirk in DD-WRT V23 SP1, some users find that when they try to define a new service, it can’t later be added to the QoS rules. A workaround seems to be creating the new service two times, each with a different name. So, we create the radmin service twice, with the names “radmin1” and “radmin2”.
Because there is no L7 filter for Radmin, we define this application the old-fashioned way. Above we’ve told DD-WRT to identify Radmin traffic as any TCP packets on port 4899.
Click the “Add” button to add the new service to the list, and then be sure to click “Apply” for the new list to actually be saved. The pop-up window now closes.

Step 5. You can also define priorities based on originating IP address rather than network protocol.


 address. This makes sense when, for instance, the machine in question might be assigned a dynamic IP. (Technically, a MAC address identifies a network adapter rather than a machine. A single machine could have multiple network adapters, and you can assign a given QoS priority to one adapter but not the other.)
 earlier, the Ethernet Port Priority settings only work with Linksys models WRT54G versions 1.0, 1.1, 2.0, and WRT54GS version 1.0, or other DD-WRT compatible routers with the ADM6996L chipset. On supported routers you can set both a QoS priority level as well as a maximum throughput threshold, as low as 256Kbps, or even disable that port entirely.
In and Out
The nature of network traffic is such that QoS levels are better controlled for outgoing traffic than incoming. The router has great control over the rate it sends out packets – it has less control over the rate they come in. To achieve incoming QoS priorities, the router may try to “stall” incoming traffic. Users reports indicate mixed success applying QoS levels to incoming traffic compared to outgoing.
Users also report mixed success with QoS levels in general, particularly with the current version of DD-WRT (V23). Some users get exactly the results they expect while others do not.
Troubleshooting
If your QoS settings don’t seem to behave the way you expect, you may need to try several approaches. You can change a service priority from an L7 filter to a port-based definition, for example. You may find that QoS levels for a machine identified by its IP rather than its MAC are more reliable, or vice versa.
In preparing this tutorial, my DD-WRT administration interface exhibited odd behavior on several occasions. Sometimes, the interface would hang after applying or saving settings, such as adding a new service priority. Often, after creating a new service definition, the interface would revert to a blank page.
In most cases, reloading the main administration page and navigating back to the QoS page resolved the hiccups. One time, the router had to be power cycled. Despite the quirks with the interface, though, ultimately the QoS settings stuck. So stick with it. @abrar2009
Setting up a WDS is a perfectly respectable thing to do. In fact, we earlier demonstrated precisely how to do it our second DD-WRT tutorial. But a WDS can be a needy thing. At a minimum, each router in the network must support WDS. For the most reliable results, each router should be the same model running the same firmware.
In the real world, you might own only one router which can run DD-WRT. Thanks to the new V24 beta firmware, a single DD-WRT router can be set up as a wireless repeater. Unlike a WDS, your DD-WRT router can now receive and redistribute a wireless signal from a generic AP.
Typically, you would use wireless repeater mode to rebroadcast a signal too weak for your wireless clients to pick up reliably – assuming that your DD-WRT router can pick up the host AP, of course. In a test case, I successfully repeated a host AP with a signal strength of only 9% as seen by the DD-WRT router – so low that the host AP wasn’t detected at all by a laptop's integrated wireless.
Wireless repeater mode also groups your local clients into their own subnet – a potential feature (for privacy) or a potential hassle (for LAN routing), depending on your needs.
Caveat Router
Because wireless repeater mode is a new feature, and technically still in beta, using it puts you on the leading edge of DD-WRT technology. This also means you may run into problems with the limitations of wireless repeater mode, and there are some.
At the time of this writing, wireless repeater mode does not yet function in bridged mode. This means that, as noted earlier, clients connected to your DD-WRT repeater must be inside their own subnet, preventing them from seeing clients connected to the host AP.
For example, if your host AP assigns clients to the 192.168.0.x subnet, your wireless repeater will have to assign its clients to another non-overlapping private subnet, such as 10.0.0.x. While clients on both subnets will be able to access the Internet (assuming the host AP has Internet access), clients on the two subnets cannot see each other. For some LAN configurations this is an undesirable problem, and you’ll have to consider WDS or a wireless bridge scenario as alternate solutions, each with their own limitations.
To set up a wireless repeater yourself, you’ll first need to upgrade your DD-WRT compatible router to the latest V24 beta. If you are currently running a DD-WRT setup, take a moment to back up its settings before flashing to V24 (Administration/Backup), in case you later decide to revert to your original configuration.
Router Setup
Take note of any wireless security currently enabled on your host router. If you are using WEP, note your passphrase and key length (64-bit, 128-bit, etc.). If using WPA or WPA2, note your passphrase. Later, you’ll need to use these to set up your repeater. Note that because DD-WRT V24 is still a beta, your mileage may vary when it comes to repeating a secured host router. Users of earlier betas reported a number of problems, but these seem to be smoothed out with the latest releases (the V24 1/15/07 release, as I write this).
Also make note of the SSID of the host AP you want to repeat. Alternatively, you can scan for available APs from within the router’s administration interface as well.
You will need to access the administration interface of the DD-WRT router you’re setting up as the repeater. Connect a wired PC to the DD-WRT router. Be sure to disable any wireless adapter on your PC for now, and plug the Ethernet cable into one of the LAN (not WAN) ports on your DD-WRT router.
Step By Step
Assuming your DD-WRT is set to factory defaults, its IP address is 192.168.1.1. If your client PC is configured to receive an IP automatically, it should be assigned an address by the router.
Step 1. Open a browser on your PC and connect to the DD-WRT router – its default address is http://192.168.1.1. The default login is root and password is admin. Of course, you should change these. If you don’t, you’ll have bad dreams involving Sally Struthers and bathing.
Step 2. Click Setup/Basic Setup. You can leave Connection Type at its default, “Automatic Configuration – DHCP.” You can leave the router and host name fields at default if you like, or customize them as we did.
The most important setting here is the Local IP Address. This must be a different subnet than that which the host AP is on. Our host AP is on 192.168.1.1, which was also the default for this DD-WRT router. Thus, we’ve changed the DD-WRT router to 10.0.0.1.
 You can leave the remaining settings alone – the DHCP enabled, etc. – and click Save Settings at the bottom of the page. Your router will reboot.
In Windows XP, navigate to Control Panel/Network Connections, right-click on the Local Area Network connection, and choose “Repair” from the pop-up menu.
Once reconnected to the router, you should open your browser to its new address – in this example, http://10.0.0.1.
Step 3. Click Security/Firewall and click to Disable the SPI Firewall. If you want any special firewall settings, you should configure these on the host router.

Unless your host router is set to G-only mode, leave Wireless Network Mode set to “Mixed”. If your host router is set to G-only, likewise choose “G-Only” here.
Set the Wireless Network Name (SSID) to the SSID of your host router. If you don’t know it and for some reason can’t figure it out, we’ll show you how to scan for it a little later.
 Leave the remaining settings at their defaults. Some claim that setting Sensitivity Range (ACK Timing) to 0 improves performance, which you might experiment with once the repeater setup is tested and working.
Important: Now click Save Settings. The page will then refresh.
To perform this trick, you will create a Virtual Interface. This will behave as a software AP, broadcasting its own SSID and bridging external wireless clients to the router, which is itself a wireless client to the host router in this configuration.
Click the Add button and the page will refresh again, with new fields for configuring the Virtual Interface.
 Fill in Wireless Network Name (SSID) with the name you want for the repeated wireless network. For best results, this should be different from the SSID for the host router. You will see this SSID available when your wireless clients scan for access points.
Leave the remaining fields at their default values as seen here, and be sure to click Save Settings.
Step 5. Click Wireless/Wireless Security. In repeater mode, you need to consider two dimensions of security:
First, is security enabled on the host router that you’re repeating? If yes, you’ll need to configure security on the DD-WRT router’s “physical interface” to match.
Second, do you want security between your repeater and local wireless clients? If so, you’ll need to configure the kind of security you want on the DD-WRT router’s “virtual interface” and, of course, on each individual wireless client that associates with the repeater.
 In this example, we’re using WPA2 security to connect to the host router. Obviously, you must enter the correct shared key as configured on the host router.
We’re also using WPA2 security for the repeated signal. Note that on the Virtual Interface, we are choosing a shared key, one which we’ll need to use on each wireless client PC.
In theory, you can select a different security mode for your repeated network (the virtual interface) than you are using with the host router. You could choose to use no security on the host router, and secure only the repeated network; or you could use security only at the host router and none on the repeated network.
Users report varying success mixing and matching security modes, most likely due to DD-WRT V24 still being a maturing beta.
Ideally, you should initially set up your repeater with no security for either interface. This assumes that you have administrative access to your host router if it is currently secured. Once the repeater is verified as working, add each layer of security separately to best pinpoint any problems.
Step 6. Scan for a host router as an alternative to manually entering its SSID in Step 4.
Click on Status/Wireless and scroll to the very bottom of the page. There you can click on Site Survey, which will pop up a window showing available wireless networks.

Troubleshooting
If you can’t seem to access the Internet from a client connected to the repeater, first check that the repeater is successfully connected to the host router.
Click Status/Router and scroll to the bottom of the page. There you will see a summary of the DD-WRT router’s WAN connection – has it received an IP address, DNS and gateway from the host router? If the IP is 0.0.0.0, it has not, and your client connection between the DD-WRT router and host router is not working.
Some people find it helpful to configure the DD-WRT as a simple wireless client first, before setting it up as a repeater. You can configure DD-WRT as a client on the Wireless/Basic page. As a client, you do not have a virtual interface, since the client can only share the host router through wired connections.
If client mode does not work, be sure to check the security arrangement between the host router and the DD-WRT router. Once client mode works with a wired PC, you can then change DD-WRT from “client” to “repeater” and add the virtual interface.
If you’re feeling especially adventurous, it is possible to set up your repeater to dynamically repeat any open (unsecured) host AP in the vicinity. The primary application for this would be to use your repeater in an, ahem, mobile configuration.
Click on Wireless/Basic and set the SSID for the Physical Interface to blank. Now click Administration/Command and enter into the command field:
nvram set wl_ssid=""
Click Save Startup and restart the router. Now DD-WRT will behave as a promiscuous repeater, which will consort with the first open AP it finds. Also, “promiscuous repeater” makes a great band name.
For the especially sophisticated, you can download a DD-WRT script called AutoAP, which can dynamically detect and repeat an available AP with the strongest signal, and can even associate with secure APs if you provide a set of keys to choose from. @abrar2009